Getting started
Login to BirdTrack (www.birdtrack.net) using your existing username and password.
Select ‘Management’ from the ‘Your Options’ menu on the left-hand side of the screen.
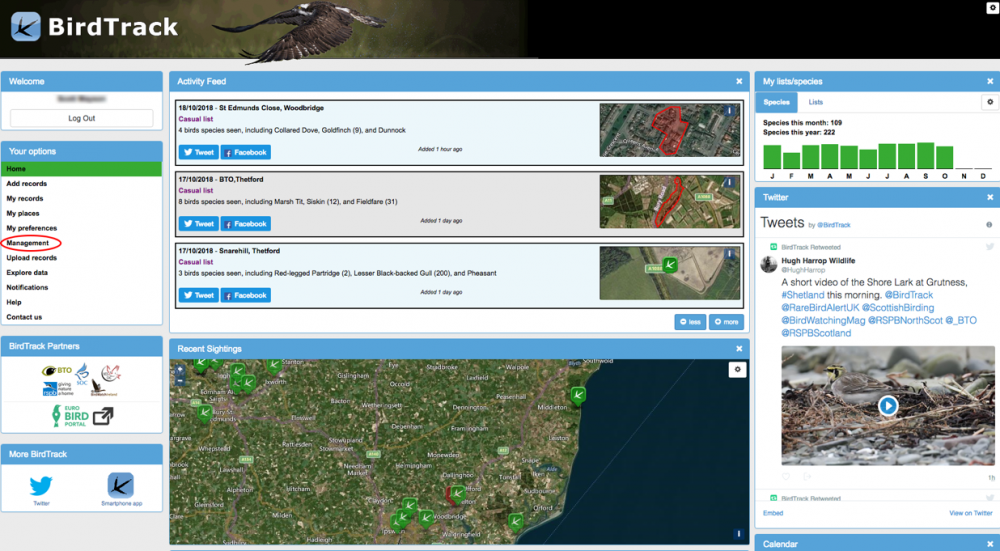
The region/county you have access to the records for will be shown in the regions selector. If you are the local recorder for several regions/counties you can select the one you wish to view records for using the selector.

Once you have selected your region/county scroll down and select ‘Check and validate records’

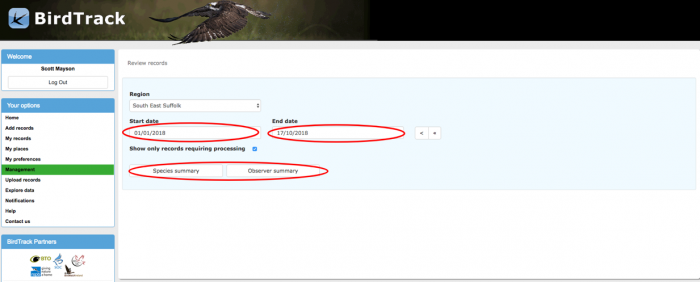
Selecting the review period
Select the start and end date to a time period of your choosing, by default the time period shown will be from the start of the current year to the previous day. Selecting ‘Species summary’ or ‘Observer summary’ will display the records that require processing within the selected time period.
Reviewing records
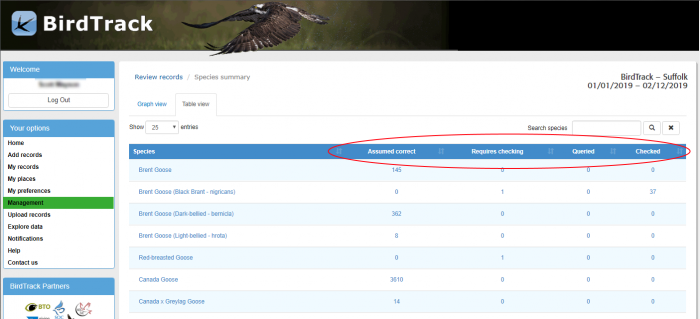
The species summaries can be displayed either in a table view,
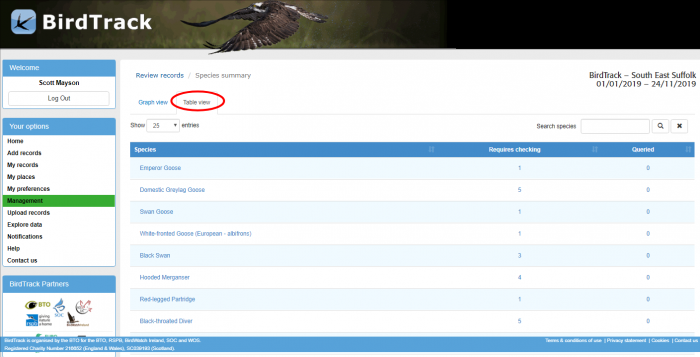
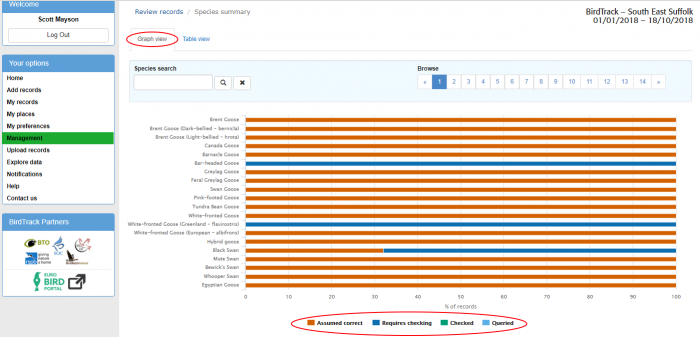
or as a graph view by selecting the appropriate option at the top of the page. Each view displays the number of records for each species that require checking or have been queried.
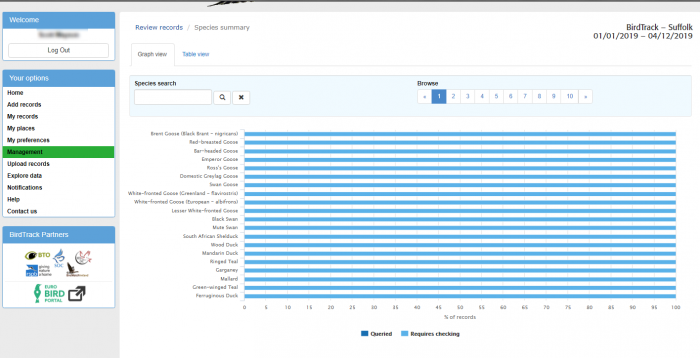
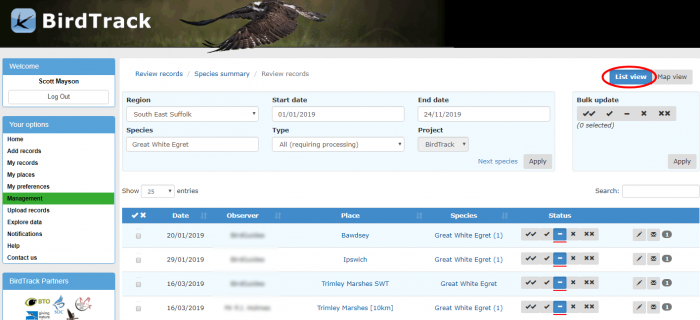
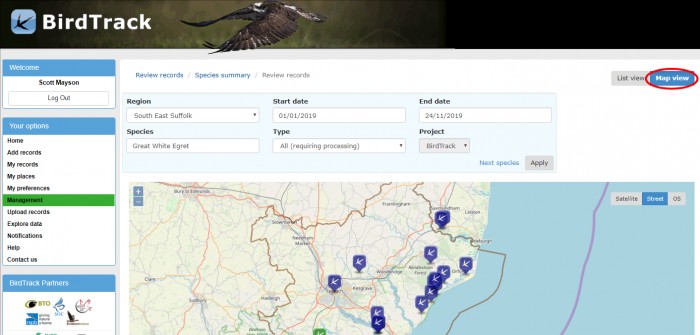
Selecting a species in either the table view or the graph view will display the records that require checking, these records can then be viewed either as a list or on a map.
List view
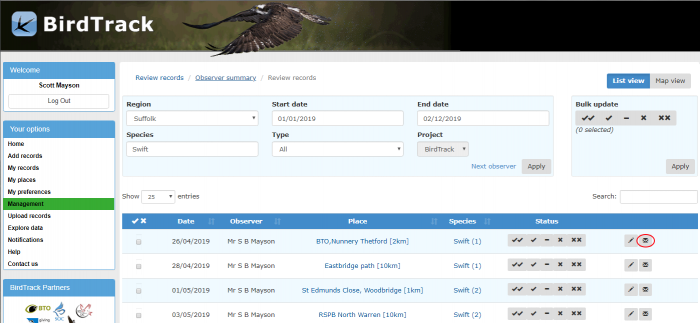
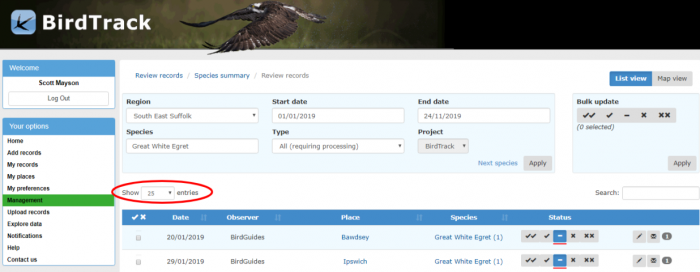
The number of records displayed on the list view page can be changed to 10, 25, 50 or All using the ‘show entries’ sector positioned at the top left of the records list.
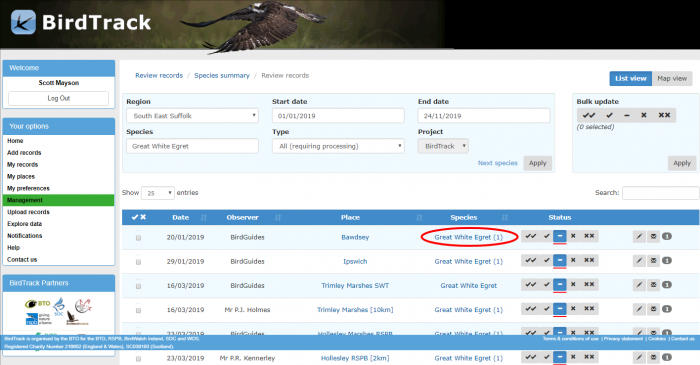
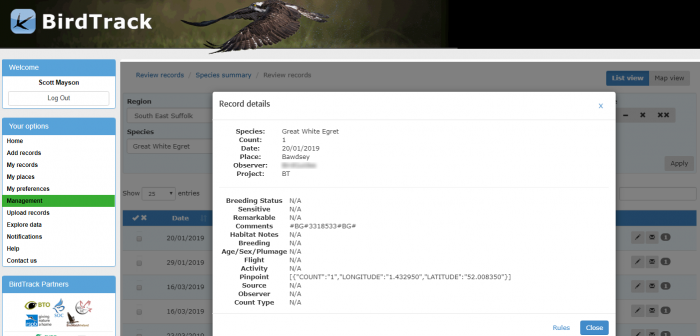
Clicking on a species name will open a pop up displaying details of the record.
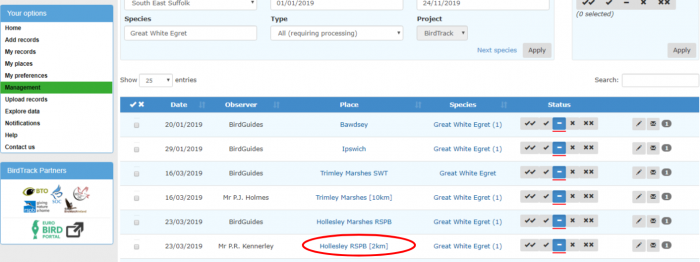
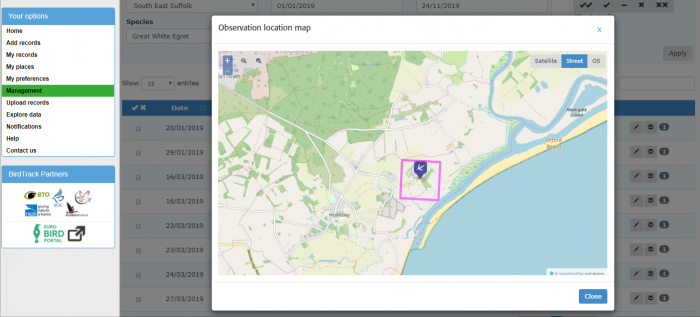
Clicking the place name alongside each entry will open a pop up displaying a map of the location for the record and the boundary of that site (shown in pink) as defined by that user, i.e. 10km, 1km, polygon etc.
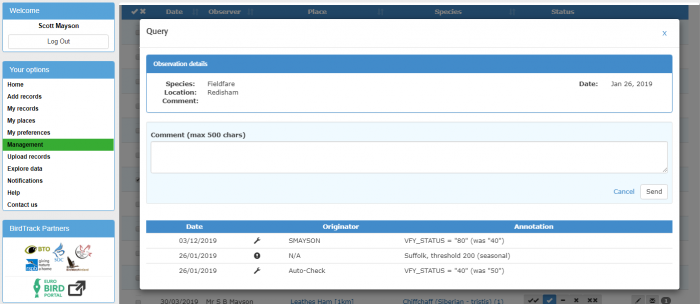
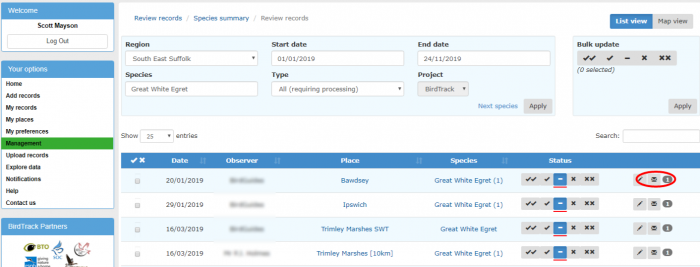
Clicking on the envelope icon in the query column will open a pop up enabling a message to be sent to the user via BirdTrack notifications (not via personal email address) to request additional information etc. if required.
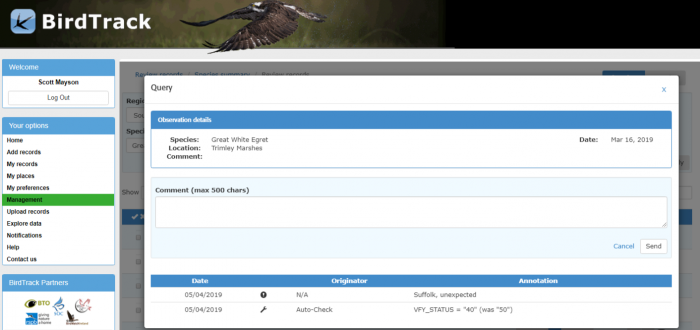
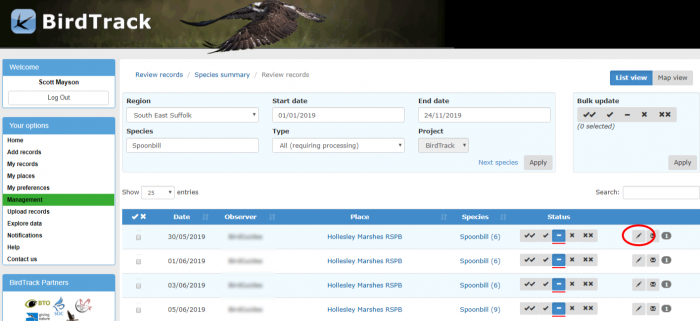
Clicking on the pencil icon in the query column will open a pop up that enables notes to be added against the record, these notes are not visible to the user. Selecting ‘Send comment to original recorder’ sends the comment to the user via notifications and allows them to respond to any questions you may have about the record.
Validate a record - individual
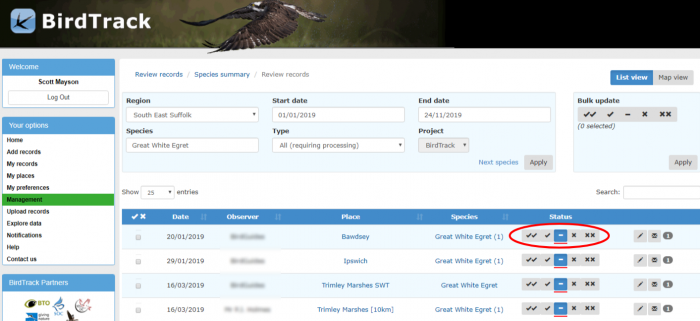
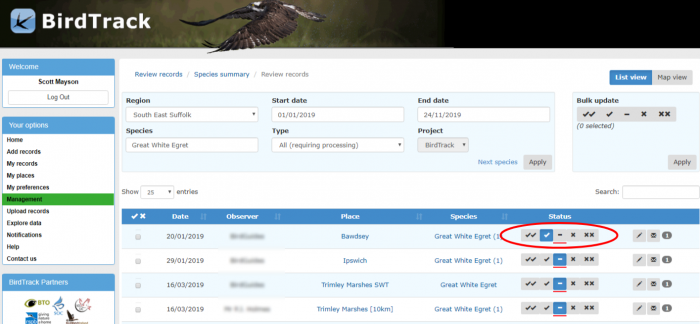
To validate/invalidate individual records select one of the 4 options under ‘Status’ These are represented as double ticks, a single tick, a single cross, or a double-cross. These status pickers represent varying degrees of validation/invalidation.
Double tick = Correct (evidence). The record has been assessed by human and accepted on the basis of evidence (including written description).
Single tick = Correct (No evidence). The record has been assessed by human and accepted, albeit without direct evidence and largely based on an assessment of likelihood vs observer competence.
Double cross = Unable to verify. The record has been assessed by human and rejected, although no direct evidence involved except assessment of likelihood vs observer competence.
Single cross = Incorrect (evidence) Record has been assessed by human and rejected on the basis of evidence
Changing the status for a particular record will change the relevant icon blue. The red line under the status box indicates what the previous status was.
Note; if a site overlaps your recording areas and appears within your region but the record is from a neighbouring county/recording area please don’t validate these records, leave them for the relevant recorder.
Validate records -bulk
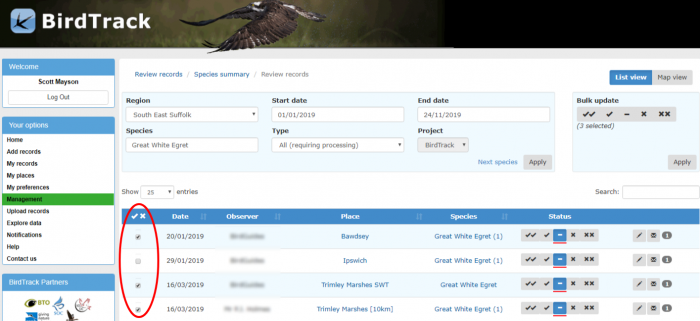
Making bulk decisions for records is done using the tick or cross to the left of the entries. Clicking the tick will select all the records while clicking the cross will deselect all the entries. Individual records can be selected/deselected from bulk selections by ticking/unticking the box to the left of the record, these records will then be omitted from any bulk updates.
The pencil icon to the right of the record status shows the previous status of the record, hovering over this icon will display the previous status e.g. requires checking.
Note; if a site overlaps your recording areas and appears within your region but the record is from a neighbouring county/recording area please don’t validate these records, leave them for the relevant recorder.
Map view
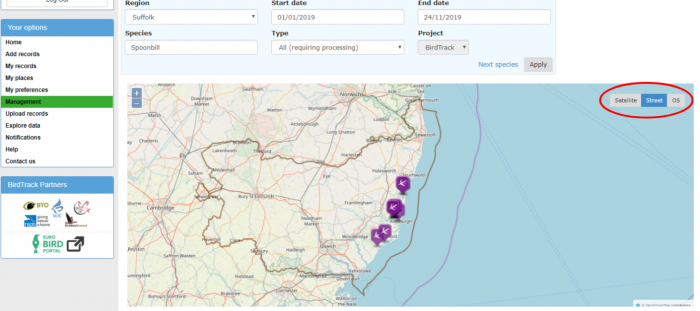
In map view, selecting a sighting opens a pop up displaying all those records for that location for the selected species. You can choose the background map you wish to use from Satellite, Street or OS map.
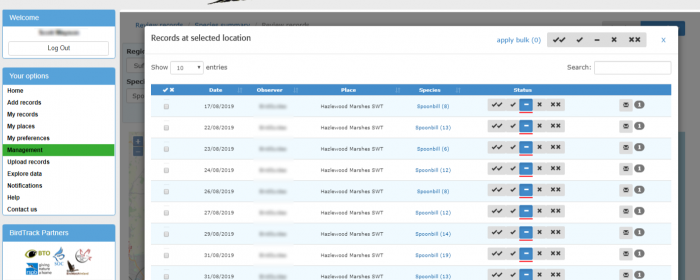
From the pop-up records can be validated or invalidated either singularly or in bulk. To validate/invalidate individual records select one of the 4 options under ‘Status’ These are represented as double ticks, a single tick, a single cross, or a double-cross. These status pickers represent varying degrees of validation/invalidation.
Double tick = Correct (evidence). The record has been assessed by human and accepted on the basis of evidence (including written description).
Single tick = Correct (No evidence). The record has been assessed by human and accepted, albeit without direct evidence and largely based on an assessment of likelihood vs observer competence.
Double cross = Unable to verify. The record has been assessed by human and rejected, although no direct evidence involved except assessment of likelihood vs observer competence.
Single cross = Incorrect (evidence) Record has been assessed by human and rejected on the basis of evidence
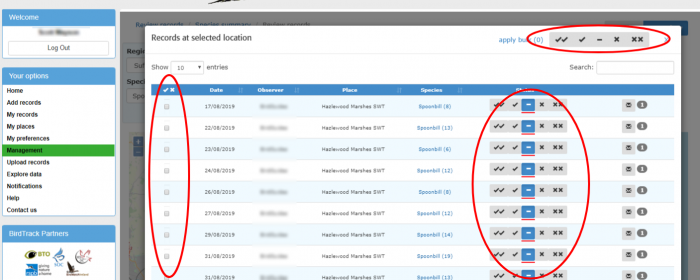
To validate records in bulk use the ü û on the left-hand side of the entries to select the records you wish to include in the bulk update. Clicking the üwill select all the records while clicking the û will deselect all the entries. It is also possible to select/deselect individual records using these boxes; those records without a tick in the small box to the left of the record will be omitted from the bulk update. The bulk update options in the top right of the pop up will allow you to make changes to all those records you have selected.
Once you have made changes click ‘Close’ on the pop up to return to the map view.
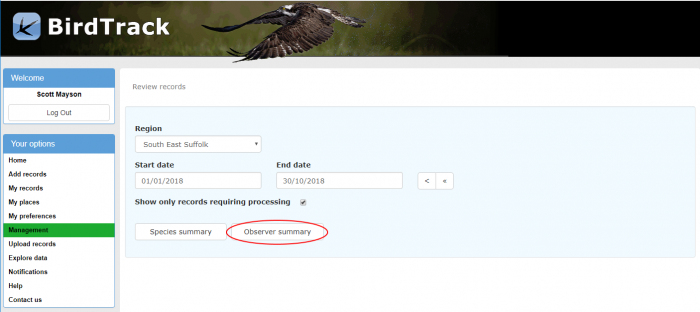
Observer summary
Select the start and end date to a time period of your choosing, by default the time period shown will be from the start of the current year to the previous day. Selecting observer summary will display the records that require processing within the selected time period.
Review records
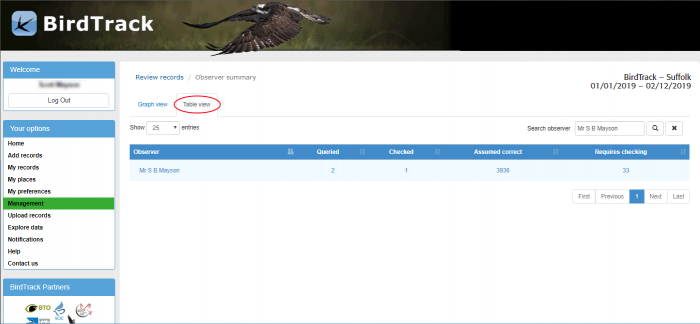
The observer summaries can be displayed either in a table view,
Or in graph view
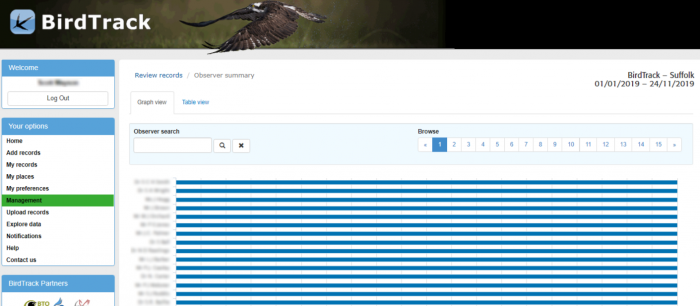
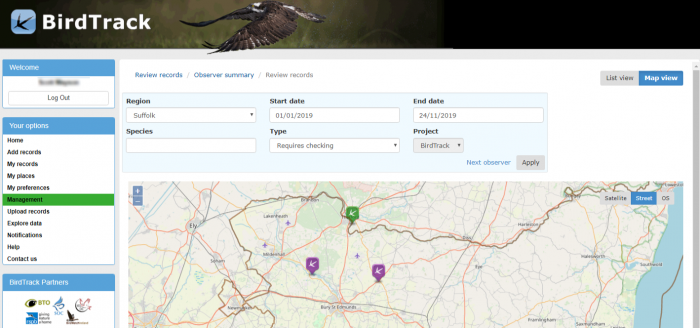
Selecting an observer in either table view or graph view will display the records that require checking, these records can be viewed either as a list or on a map.
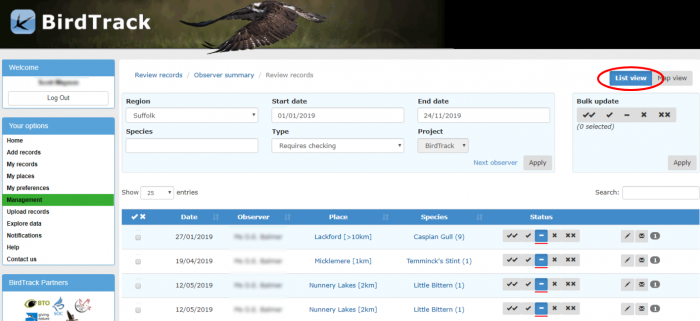
List view
The number of records displayed on the list view page can be changed to 10, 25, 50 or all using the ‘show entries’ sector positioned at the top left of the records list.
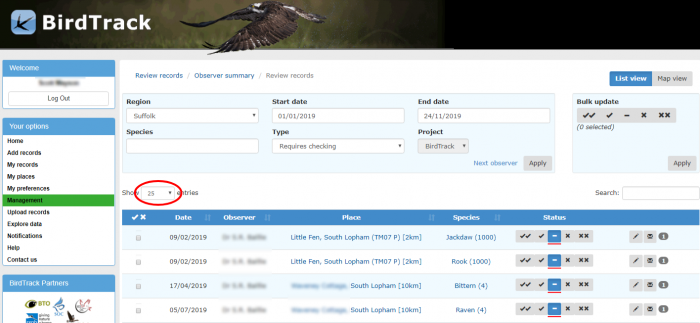
Selecting a species name opens a pop up displaying the record details.
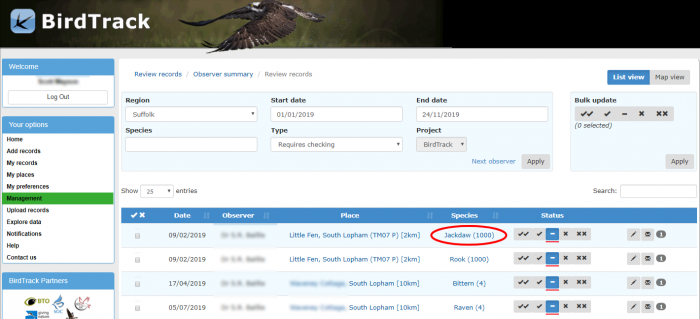
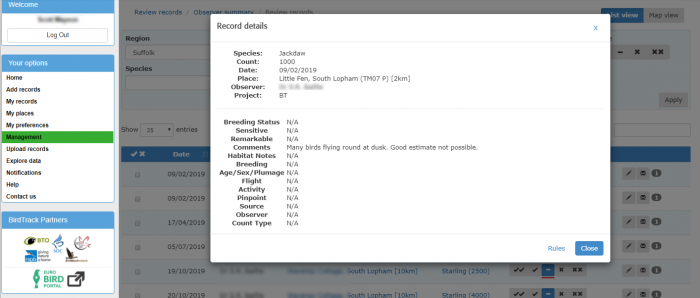
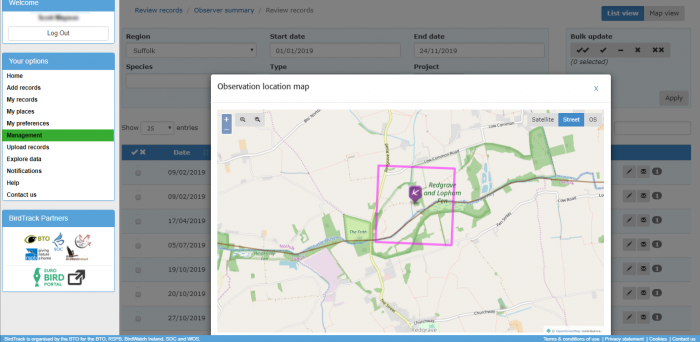
Clicking the place name alongside each entry will open a pop up with a map of the location for the record and the boundary of that site as defined by that user, i.e. 10k, 1k, polygon etc
Clicking on the envelope in the query column will open up a pop up that enables you to send a message to the user via BirdTrack (not via personal email addresses) to perhaps request additional information etc. if required.
Validate records - Individual
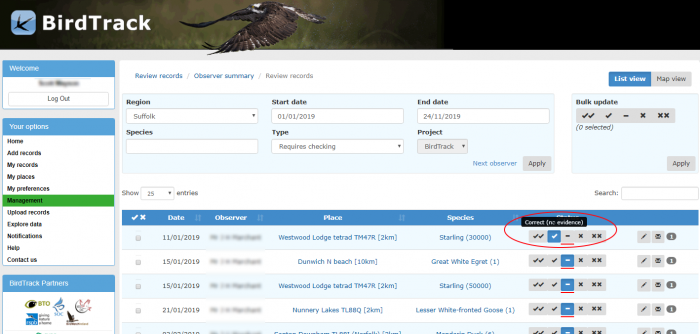
To validate/invalidate individual records select one of the 4 options under ‘Status’ These are represented as a double tick, a single tick, a single cross, or a double-cross. These status pickers represent varying degrees of validation/invalidation.
Double tick = Correct (evidence). The record has been assessed by human and accepted on the basis of evidence (including written description).
Single tick = Correct (No evidence). The record has been assessed by human and accepted, albeit without direct evidence and largely based on an assessment of likelihood vs observer competence.
Single cross = Unable to verify. The record has been assessed by human and rejected, although no direct evidence involved except assessment of likelihood vs observer competence.
Double cross = Incorrect (evidence) Record has been assessed by human and rejected on the basis of evidence
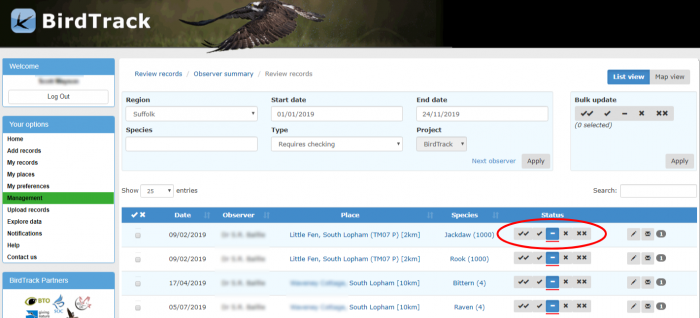
Changing the status for a particular record will show as a blue icon with either a white tick or cross.
Validate records - Bulk
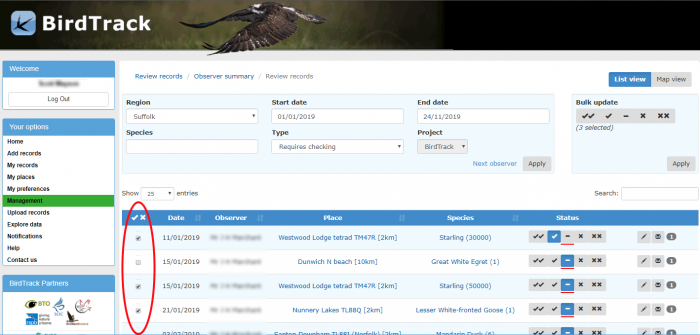
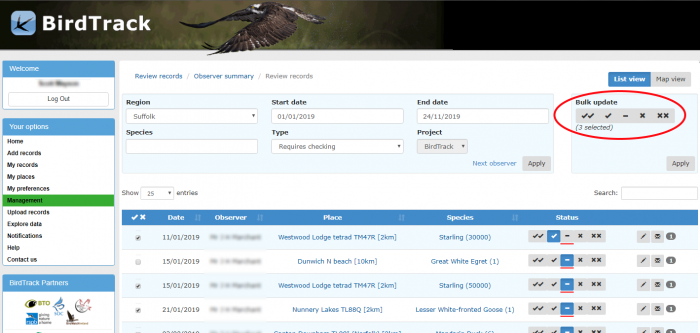
To make bulk decisions for records use the tick/cross on the left-hand side of the entries. Clicking the tick will select all the records while clicking the cross will deselect all the entries. Individual records can be selected/deselected from bulk selections by ticking/unticking the small box to the left of the record to be omitted from the bulk update.
Map view
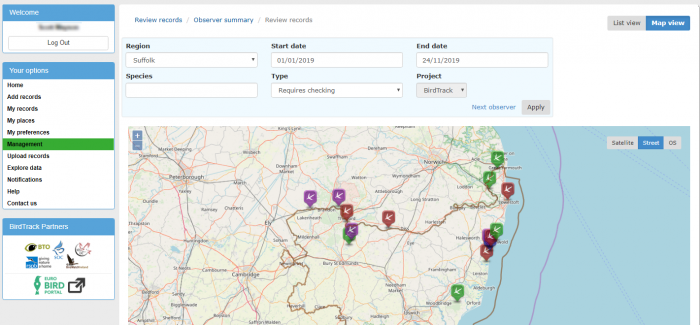
In map view, selecting a sighting opens a pop up displaying all those records for that location for the selected observer. The different coloured pins in the map denote the type of record, Purple = High count, Green = local rarity, Red = National rarity, Blue = Sensitive during certain times of the year.
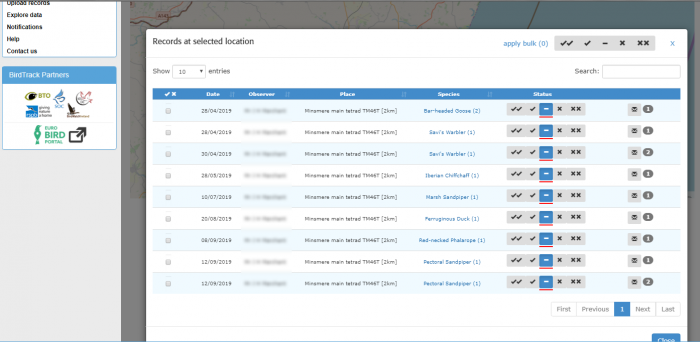
From the pop-up records can be validated or invalidated either singularly or in bulk. To validate/invalidate individual records select one of the 4 options under ‘Status’ These are represented as double ticks, a single tick, a single cross, or a double-cross. These status pickers represent varying degrees of validation/invalidation.
Double tick = Correct (evidence). The record has been assessed by human and accepted on the basis of evidence (including written description).
Single tick = Correct (No evidence). The record has been assessed by human and accepted, albeit without direct evidence and largely based on an assessment of likelihood vs observer competence.
Double cross = Unable to verify. The record has been assessed by human and rejected, although no direct evidence involved except assessment of likelihood vs observer competence.
Single cross = Incorrect (evidence) Record has been assessed by human and rejected on the basis of evidence
To validate records in bulk use the ü û on the left-hand side of the entries to select the records you wish to include in the bulk update. Clicking the üwill select all the records while clicking the û will deselect all the entries. It is also possible to select/deselect individual records using these boxes; those records without a tick in the small box to the left of the record will be omitted from the bulk update. The bulk update options in the top right of the pop up will allow you to make changes to all those records you have selected.
Once you have made changes click Close on the pop up to return to the map view.
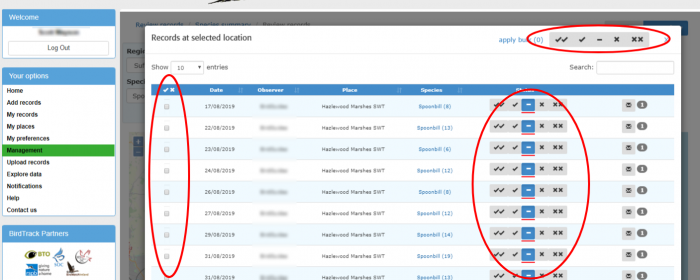
Review all records
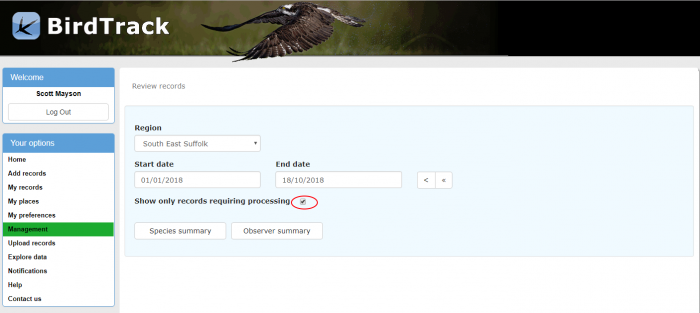
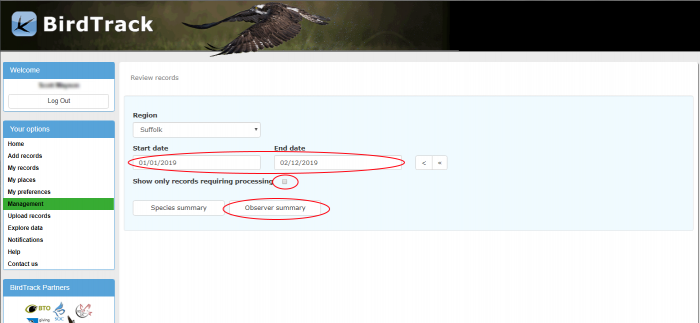
To review those records not marked as ‘requiring processing’ i.e. those records that don’t break any thresholds un-tick the box beside ‘Show only records requiring processing’ on the review records page, then either select species summary or observer summary.
Records can be displayed either in a table view or a graph view by selecting the appropriate tab.
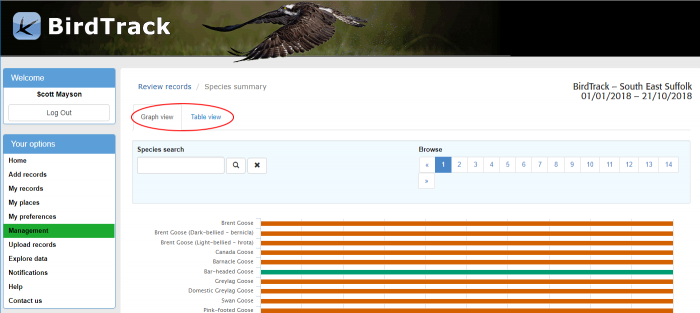
In the table view against each species summary the number of each verification type is shown in the appropriate column; queried, checked, requires checking and assumed correct. Clicking on any of these titles will sort them in ascending/descending order.
In the graph view, the records are displayed showing the categories as coloured bars alongside the species name. At the bottom of the page, a key to the categories is shown and each category can be selected/deselected.
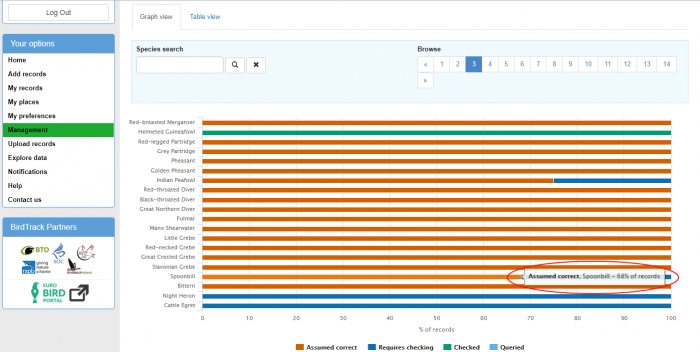
Selecting any of the bars of the graph displays a page detailing all the reports within that criteria i.e. assumed correct, requires checking, checked, or queried. The records can then be verified in the same ways as covered earlier in the walkthrough
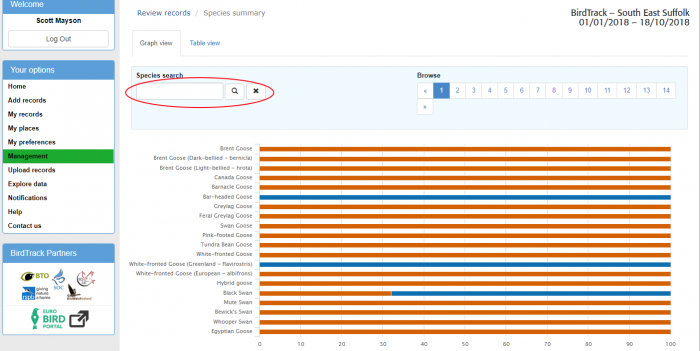
The species search box above the graphs allow you to ‘jump’ to a particular species.
The filter box at the top of the review records page changes the type of records to be viewed, for example, to view all the records that have been checked select ‘Checked’ drop-down list under ‘Type’.
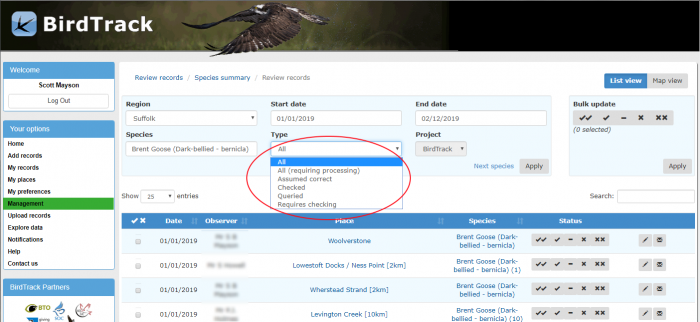
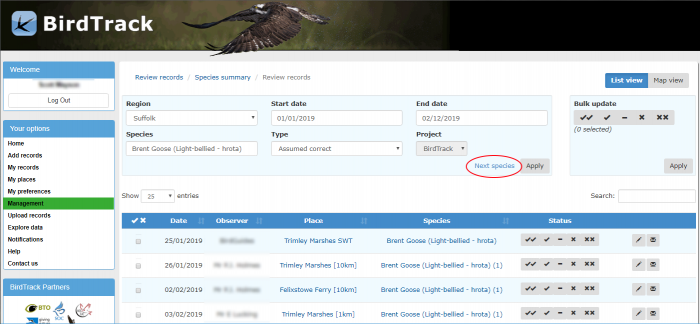
The various filters at the top of the ‘Review records’ page also allow changes to the selected dates, the species to be reviewed, and for some users the region they are verifying the records for. The next button will progress to the next species on the list of records requiring checking.
Searching for a particular record
The club records download provides the user name for a record, this can be used in verification to search for a record should you wish to contact the user for more details about the sighting. To search for a record start by using the start and end dates on the review records page to narrow the search down to the period you are interested in, and then deselect ‘show only records requiring processing’, and then select observer summary.
Entering the user name in the observer search box and clicking the search button will display all the records for that user.
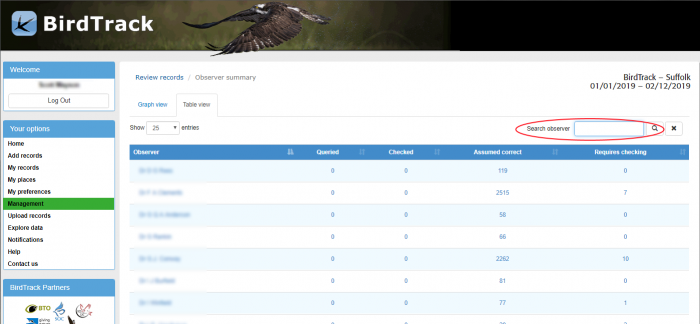
This summary of records can be viewed either as a graph or as a table.
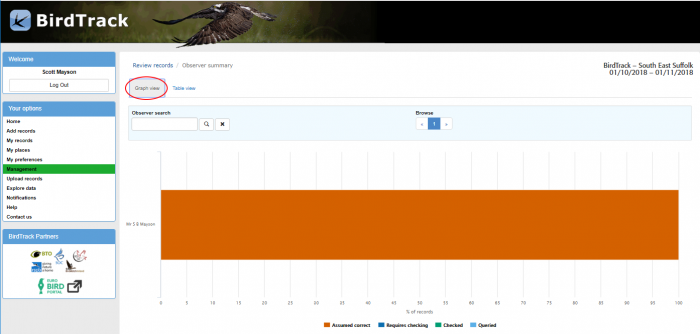
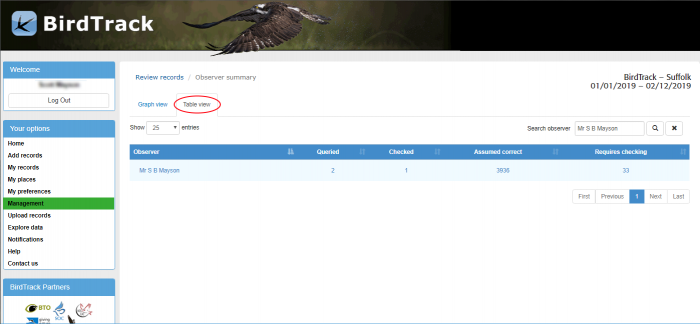
Table view allows you to narrow the search, first select the observer’s name.
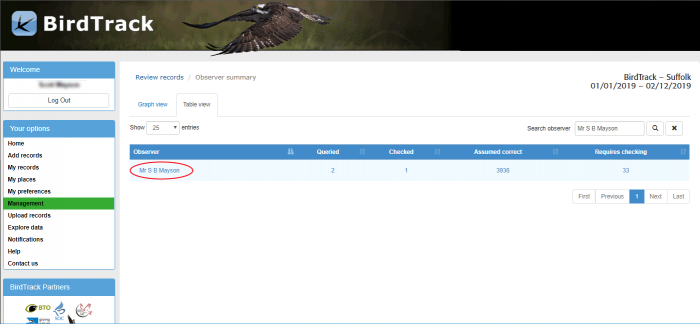
This will display all the records for that user, you can then use the species filter and type filter (set to ALL) to display the records for a particular species.
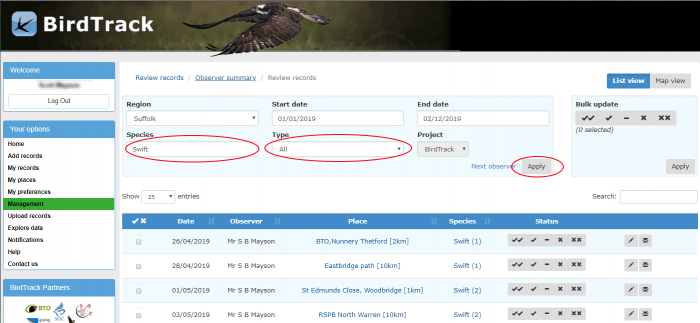
Once you have located the record you wish to query use the envelope icon to send the user a message via BirdTrack notifications.
